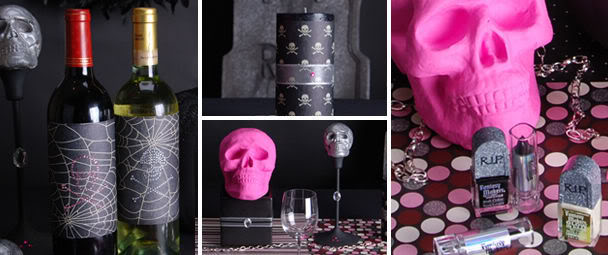
Abstract skull & scroll patterns, contemporary florals crawling with spiders, orange and black ostrich feathers, and shimmery dishes give this Halloween soirée a very modern twist!
Ghoul's Night Halloween Party
Evite offers the best place to make an online invitation, click on the pic above to be taken to this theme's invitation. :)
Follow these steps for a ghoulishly good time ahead.
The background for this invitation is a plain brown paper bag. Use one sized for carrying lunches – they're inexpensive and widely available grocery stores.
Fold the bag in half, creasing firmly, and open it back up. Measure the inside of the card and deduct one inch from both dimensions to determine the size of the written card (shown in white). For example, if the dimensions of that part of the bag are 4" x 6," you'll want to trim your card to 3" x 5."
For the inside text, you can use your computer and the font of your choice, make use of scrapbooking supplies, or simple write it out with a marker. Make sure that your text fits the dimensions you determined in step two if you print it so you will be able to trim it easily (just like the photo below).
Once you have the inside card ready, staple it to the paper bag as shown.
Next, cut out approximately five circles from orange construction paper. On one, write "Boo to you" or another message of your choice. Take a small length of green ribbon (as shown) and loop it from the front of the circle to the back, twisting it once to create the stem effect. Staple the ribbon in place.
Use a glue stick to affix the circles to the card as shown. Allow to dry.
Meanwhile, cut a length of black ribbon that's about three times as long as the distance from the top of the card to the bottom. Tie it into the fold of the card down the "spine."
Tie a short length of orange ribbon to the black ribbon to add visual interest.
The final step is to put the Halloween tab on the side of the card. The example makes use of a clear file folder tab, but if you don't have one on hand you can attach the tab directly to the card.
The easiest way to make the "Halloween" tab is to use black cardstock and a silver marker. Slip the piece into the file folder tab first, or just staple it directly to the side of the bag, slipping it into the opening for a neater appearance. These kids Halloween party invitations are ready to deliver!
A Chorus of "BOO"s
Here are some kids Halloween party invitations that kids can easily make themselves! You'll need folded white cardstock for all of them, plus a background of orange or blue (as pictured) or another color of you choice. Here is the one I made for my children's last halloween party:
Have pieces of felt, a black marker, black and yellow construction paper, and white puff paint on hand to complete the designs pictured.
Here's how to make each card:
Ghost – Glue the background to the folded card at an angle. Cut the ghost shape from felt and glue it down. Use Black felt for the mouth and eyes, then write "Boo!" with the puff paint.
Pumpkin – Center the background on the folded card. Cut the pumpkin shape from orange paper and draw the lines on with a marker. Trim black felt into the stem, eyes, and mouth before gluing them down and writing "Boo!" with the puff paint.
Spider Web – Draw the center of the web with a black marker, filling it in completely. From the points, draw lines to the edge of the paper. Go back and add the connecting strands. Add felt circles for spiders, drawing on the legs, and write "Boo!" with puff paint. Glue the background to the card.
Witch – Cut a yellow circle from construction paper for the moon and a dark cloud from black paper and glue both down, allowing the cloud to overlap the moon. For the witch, cut the triangular hat from felt. Cut a rectangular shape from orange felt, trimming it most of the way up. Finally, cut the witch's shirt from black felt. Glue down the shirt, then the overlapping hair, and then the hat over that. Write "Boo!" with puff paint.
Open up the cards to write your party details and these kids Halloween party invitations are ready to go!